
Deploying GTM Server-Side on Cloud Run
It's been a long time since the last post, and lots of exciting news has been introduced since last year. For example, Apple has introduced further restrictions in app and web tracking with their newest revision of ITP, Google Analytics 4 has been launched (outside of beta), and Google Tag Manager has received a new container type, the Server-Side container.
The last topic is what I will focus on in this post. Server-side tagging introduces massive opportunities for tracking, where I find the possibility to create real-time web tracking pipelines the most exciting. As the Server-side container type is still in beta, there are many limitations of what can be done directly with pre-built clients/tags, but I'm sure that Google has an aggressive plan to expand and simplify server-side tracking in the coming months, and I will be sure to dive into new features as soon as they are introduced. If you need to get up to speed with server-side tagging, I recommend reading Simo Ahava's excellent blog post about the topic, which covers most basic concepts.
With that said, let's get going with the story that I wanted to write about, namely why and how to set up a GTM server-side container – completely free – via Google Cloud Run.
GTM Server-Side Infrastructure
One roadblock that made me think twice about setting up a GTM server-side container for my own website was that the default GTM server-side setup runs on Google App Engine, and costs about $100/month. Although this is a small cost for companies, I am ungenerous when it comes to spending money on my own website. I like finding free (or if necessary cheap) solutions when it comes to hosting, as it's fun to think outside the box and nice to save a few bucks to spend on overpriced gaming laptops.
For those of you unfamiliar with Google Cloud Platform, App Engine is basically a server for deploying (web) apps that can scale from one instance up to dozens of instances if necessary. When it comes to small websites, such as this blog, one App Engine instance is more than sufficient for handling all incoming traffic, and most of the time the server instance will just be idle waiting for requests to handle. Unfortunately, App Engine cannot be scaled down to zero instances which means that you will have to pay for at least one instance even if the server is idle.
This is where Google Cloud Run comes into play. It is a serverless and scalable containerized service that scales all the way down to zero if there's no incoming traffic. When it comes to deploying GTM server-side on Google Cloud Run, it's a perfect fit for low-traffic websites and for setting up a playground for learning GTM server-side. Running GTM Server-Side on Cloud Run is completely free for my website, although mileage will vary depending on the amount of request that is processed. According to tracking all-star Mark Edmondson it will be cheaper to host GTM Server-Side on Cloud Run for websites with less than ~1 million hits per month. Thus, for high-traffic websites it's probably a better idea to deploy GTM SS via App Engine.
From my practical experience, I haven't seen any specific upsides or downsides apart from the cost aspect of deploying GTM SS on Cloud Run vs App Engine. Though admittedly I haven't done any experiments for comparing the performance between the deployments. As it's easy to migrate GTM SS from Cloud Run ↔ App Engine, I recommend testing both deployment types to see which one you prefer.
Google Tag Manager Setup
To make the setup guide as general as possible, I will show you how to deploy GTM SS on Cloud Run via Cloud Shell – a built-in terminal in Google Cloud Platform.
Before we get started in Google Cloud Platform, we need to create the GTM SS container. Head over to tagmanager.google.com and click on the 'Create Container' button.

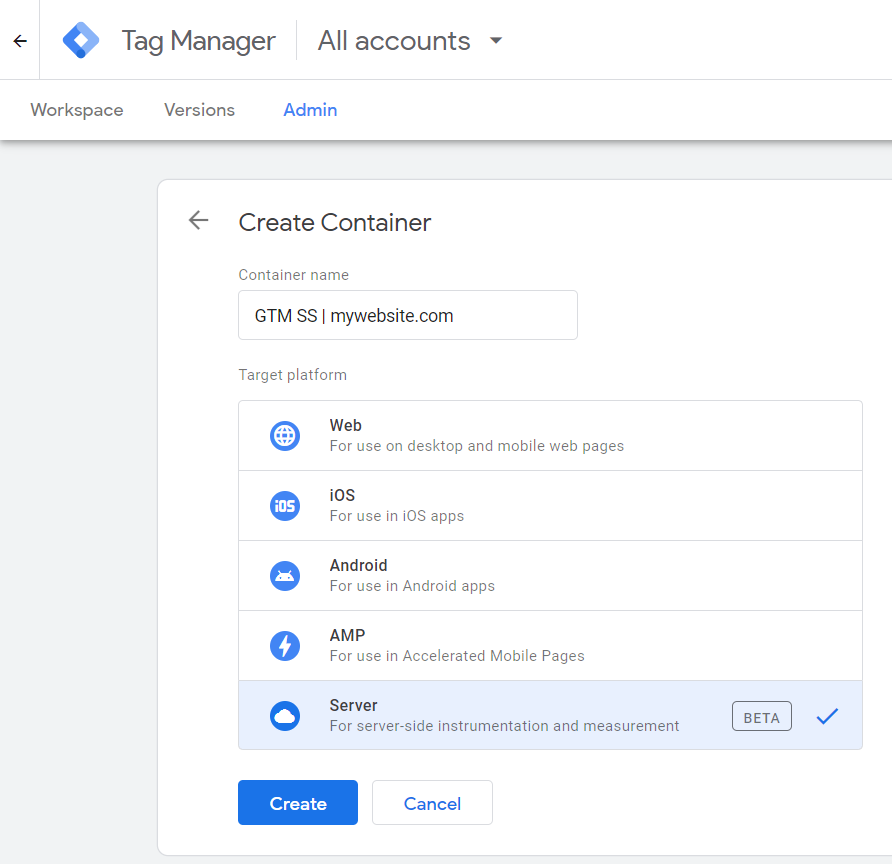
On the next page, select 'Server' as the target platform and give your new container a name.
Now it's time to pay close attention. After clicking the 'Create' button a new container is provisioned and you will see a pop-up asking you where to set up your tagging server. The default alternative here is that Google automatically provisions a tagging server for you. This means that Google creates a Google Cloud Platform project and boot up an App Engine instance for you. As we want to deploy GTM SS on Cloud Run instead, choose 'Manually provision tagging server' and close the pop-up. Don't worry about the 'Container Config' for now as that is still available under 'Container Settings'.
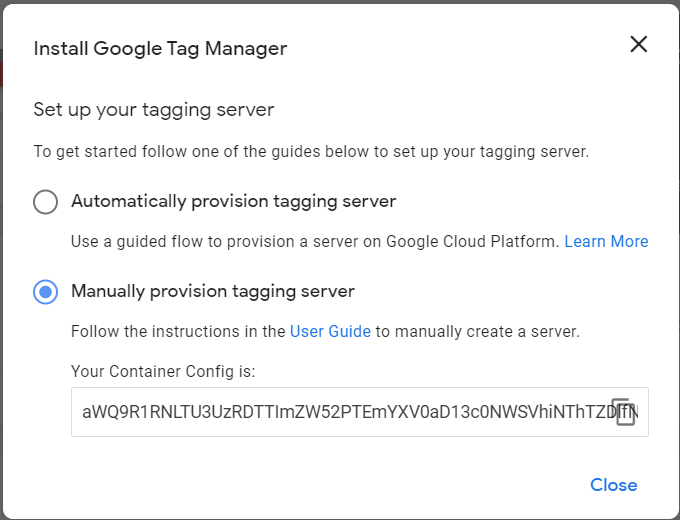
Now we are prepared to move on to Google Cloud Platform where we will set up GTM SS via a Cloud Run container.
Enabling Google Cloud Platform API:s
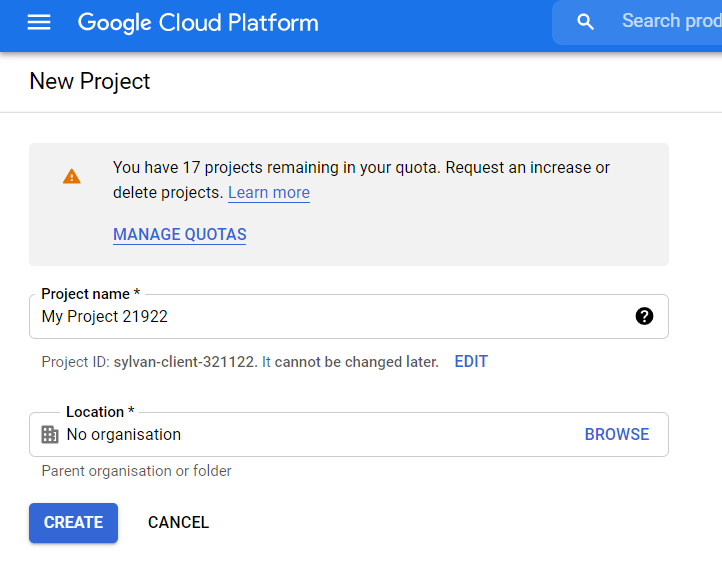
Open console.cloud.google.com. If you haven't already created a project, it is now time to do so. Give your project a name, and link it to a Billing Account. In case you haven't got a Billing Account since earlier you can follow Google's documentation on how to create one and link it to a project.
EDIT: As robertsahlin kindly pointed out, copying the GTM SS docker image to a local container registry is not necessary. Instead you can simply point the Cloud Run container directly to the GTM SS image hosted by Google.
I have updated the instructions below, but will leave the existing guide in case anyone would like to know how to copy an image to a local container registry on Google Cloud Platform.
-- OUTDATED INSTRUCTIONS START --
Once the project is up and running, go to the top search bar and search for 'Google Container Registry API' – click on the recommended service. This will take you to a page where you can enable this API, which will be necessary at a later stage. Simply click the 'ENABLE' button.
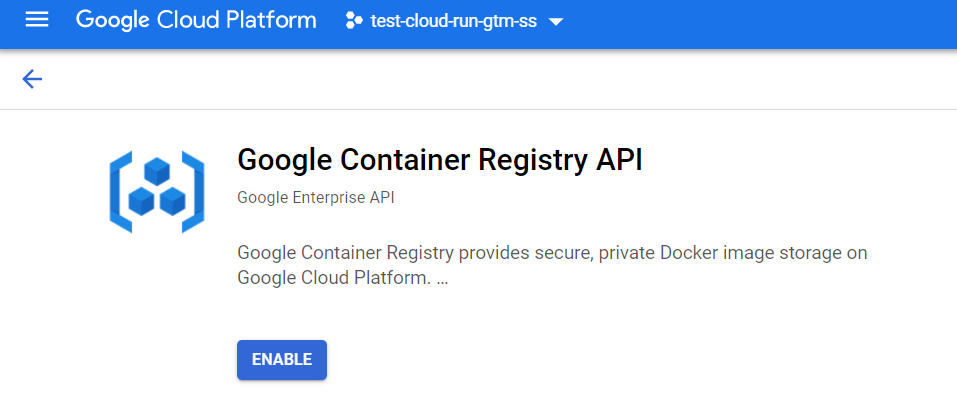
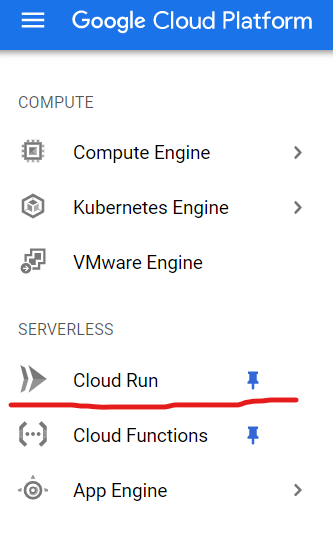
Wait a few seconds for the API to be enabled, thereafter open the navigation menu and click on 'Cloud Run'.
Copying the GTM SS Container Image
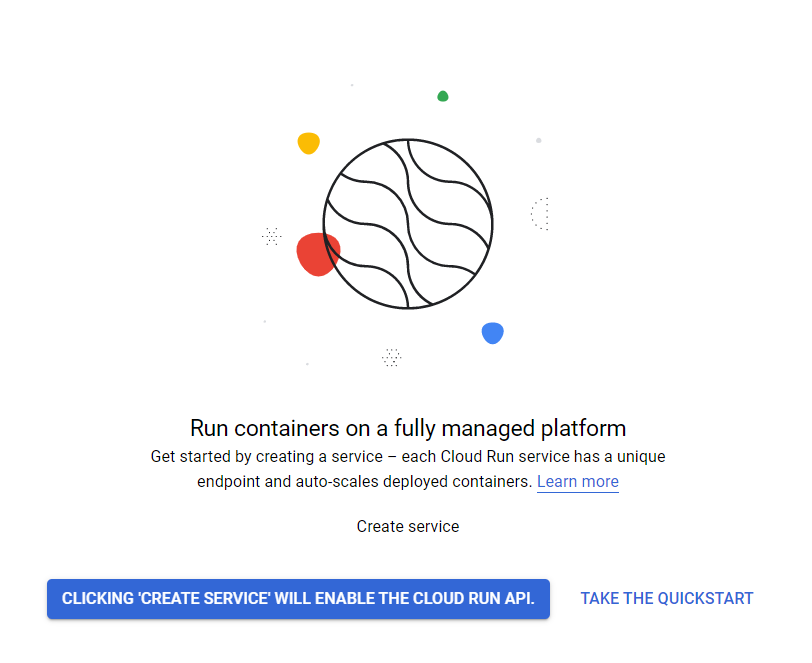
In case you are greeted by the page in the picture below, push the “CLICKING 'CREATE SERVICE' WILL ENABLE THE CLOUD RUN API” button, which will activate the Cloud Run API (as you probably understood from the very descriptive button text).
Now a new page will show up where you can input service settings, but before choosing settings we need to do some preparations. As Cloud Run needs a container “image” to work. A container image is a fancy name of a file which gives instructions of how the container environment should be configured, for example what packages to download, what network port to open and which script to run. Thankfully Google has already created all the image files, so the only thing for us to do is uploading them to a place where our Cloud Run container can access the image. In Google Cloud Platform that place is known as Google Container Registry.
To upload the GTM SS image to Container Registry we will use the built-in terminal in GCP. Take a look at the top right corner of the window, there you can see a terminal symbol – click on it to open Cloud Shell (the terminal).

A bash terminal will now pop-up at the bottom of the screen. From Cloud Shell we are going to download the Docker image that GTM SS uses and upload it to Container Registry.
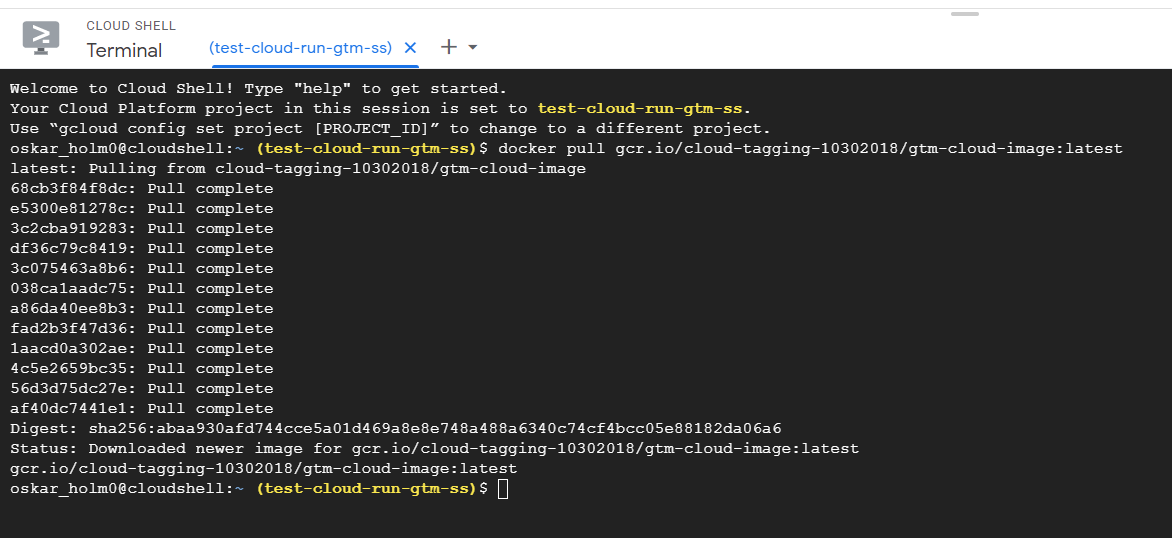
To make this happen we will need to input three commands into the terminal. The first command will download (pull) the GTM SS Docker image.
Command 1:
docker pull gcr.io/cloud-tagging-10302018/gtm-cloud-image:latestAfter inputting the command you will need to authorize that Cloud Shell is allowed to make calls to Google Cloud Platform APIs.
The next command will set the file location of the image i.e where to upload it. Container Registry uses the domain gcr.io for storing images. If you want the image to be stored on EU servers, make sure to use the European Google Container Registry domain eu.gcr.io.
I usually use my project ID as part of the URL path for the image, but choose after your liking. Multiple images can be uploaded to the same URL path, you can think of the URL as a folder.
Command 2:
docker tag gcr.io/cloud-tagging-10302018/gtm-cloud-image:latest eu.gcr.io/your-project-id/gtm-ss-image
The last command will upload (push) the GTM SS image to your chosen file location in Container Registry.
Command 3:
docker push eu.gcr.io/your-project-id/gtm-ss-image
Good job! With those three commands you have now uploaded the GTM SS image to Container Registry. We are now ready to start setting up the Cloud Run container.
-- OUTDATED INSTRUCTIONS END --
Configuring Cloud Run
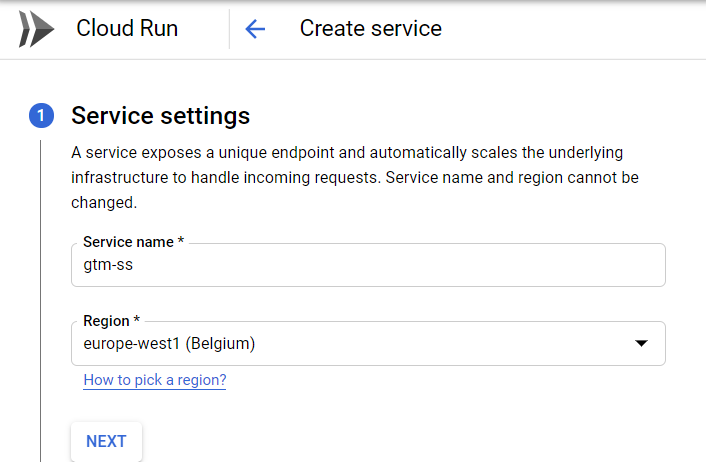
Start by giving your Cloud Run service a name, and choose the region for where the service is to be hosted. In my case, I named the service 'gtm-ss' and chose 'europe-west1' as the region. Click 'NEXT'.
In step 2, you are urged to configure the service's first revision. This means that we must choose the container image which instructs the Cloud Run service what to do.
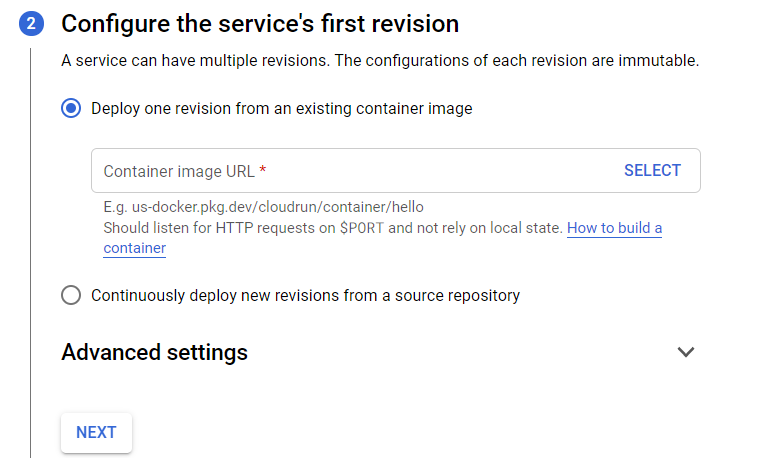
Choose the option “Deploy one revision from an existing container image”. Paste the URL "gcr.io/cloud-tagging-10302018/gtm-cloud-image:stable" in the 'Container image URL' field.
In case you wish to use a locally stored image instead (which is neither necessary or recommended), click on the “SELECT” button in the 'Container image URL' field. A window will open up on the right side of the screen. Here you will find the file location path that you previously chose for your image. Expand the path, and you will see an image ID which consists of some random characters, in my case 'abaa930afd'. Click on the image ID, and press 'SELECT' to choose it as the Cloud Run service's image. If you were to upload new images to the same location, the images would be appended to the list.
Before moving on to the next setup section, open up the 'Advanced settings' tab.
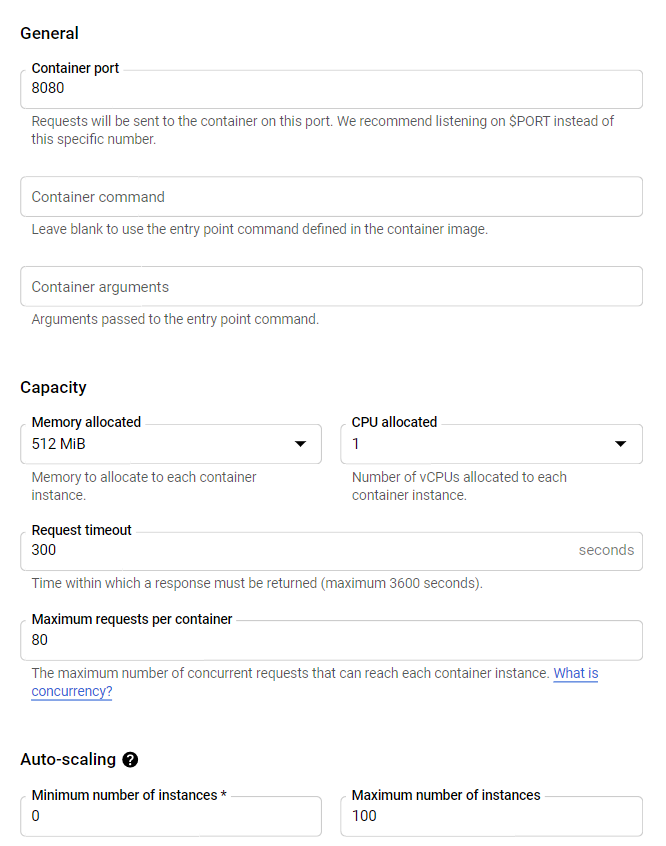
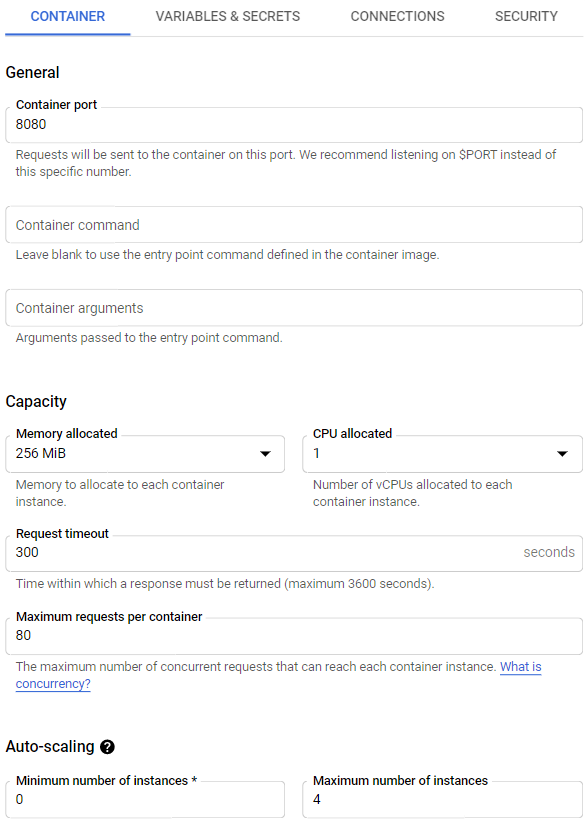
We will start by looking at the 'CONTAINER' settings. Leave the 'Container port' as is ('8080'). Under 'Capacity' settings, you can lower the 'Memory allocated' from 512 MiB to 256 MiB. Depending on your use cases you might need more memory, but for basic server-side tracking 256 MiB works well. Under 'Auto-scaling', which decides how many instances that your service can scale up to, I recommend lowering the number significantly.
Allowing flexible auto-scaling can be useful in cases where the traffic to the website varies greatly, but it can also impose a risk of quickly escalating cost in case badly implemented code is run on the GTM server. For my website with very low traffic volumes I use '4' as the 'Maximum number of instances'. Leave 'Minimum number of instances' as 0 as we want the Cloud Run service to be able to scale all the way down to no active instance in case there is no traffic to your website.
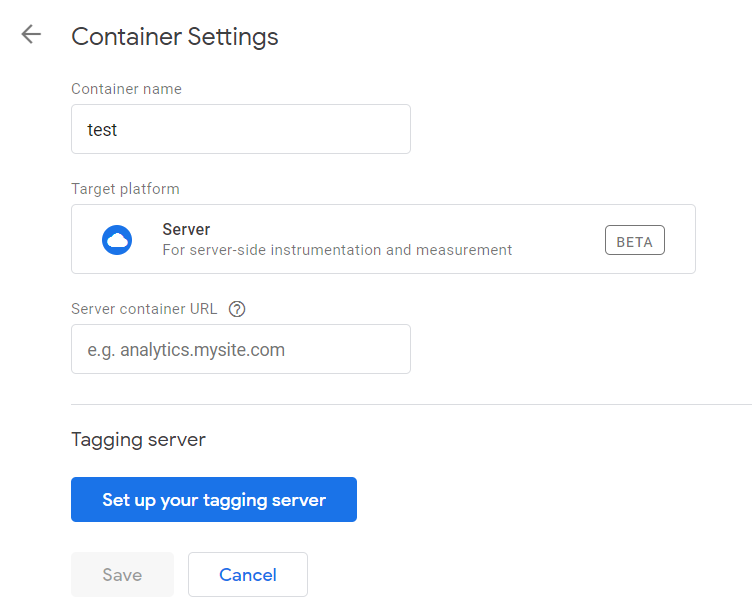
Next, open up the 'VARIABLES & SECRETS' tab. Here we can set variables that the Cloud Run container has access to. Click on the 'ADD VARIABLE' button, and you will see that two columns and a row were added. In the field, input CONTAINER_CONFIG in the 'Name' column. Does the term 'container config' sound familiar? That's because it showed up earlier when you created your GTM server-side container. Head back over to Google Tag Manager and open up your server container. Open the 'Admin' tab and click on 'Container Settings'.
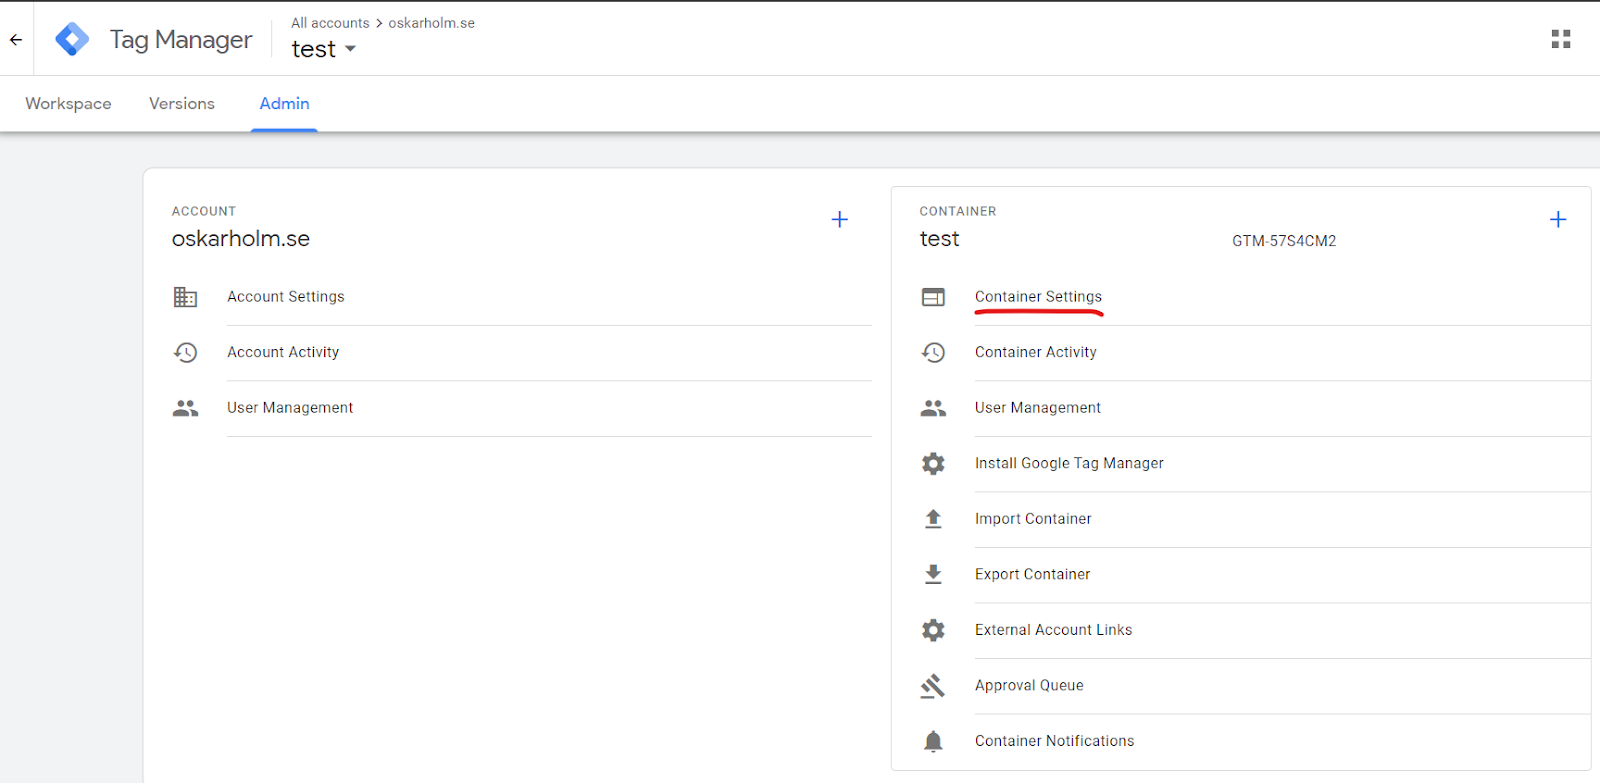
Click on the 'Set up your tagging server' button, and choose the option 'Manually set up provision server'. In the bottom of the popup you will find your container config, which is a unique identifier for your GTM server. Copy it and paste it into the 'Value' column next to the CONTAINER_CONFIG variable name in GCP.
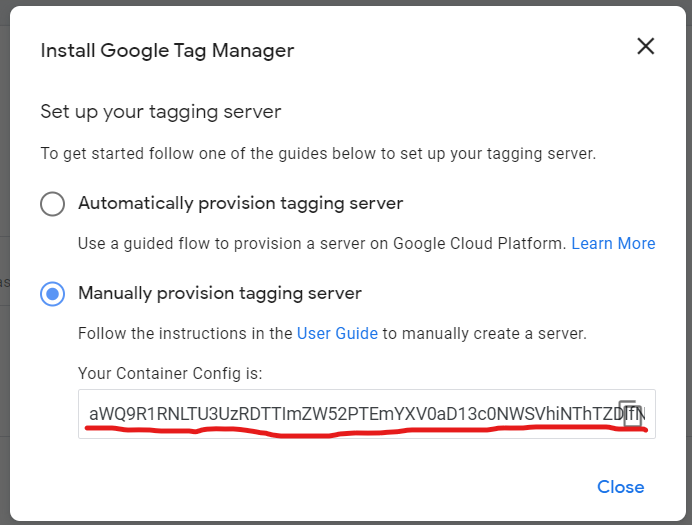
Now in the second row of the 'Name' column, input PREVIEW_SERVER_URL. This variable will tell GTM Server-Side which URL that you will be using for debugging. Choose a URL on your website that you would like to use for debugging the GTM SS setup. Personally, I chose 'preview.oskarholm.se' for my website.
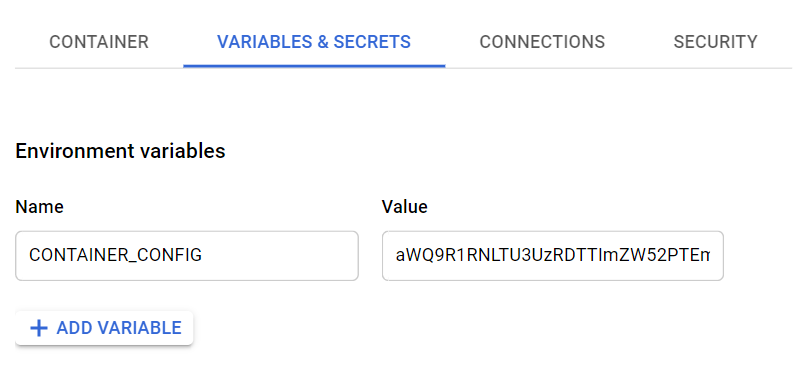
Nice! We are now finished with the advanced settings. Scroll down to the bottom of the settings page and click on the 'NEXT' button.
The last step before publishing the Cloud Run service is to choose when the service is to be invoked. As the service will be used to track events on public websites, you want anyone visiting your website to be able to invoke the service, i.e. send events that they have triggered to your GTM SS container. Thus choose the options to 'Allow all traffic' and 'Allow unauthenticated invocations'. Click the 'CREATE' button.
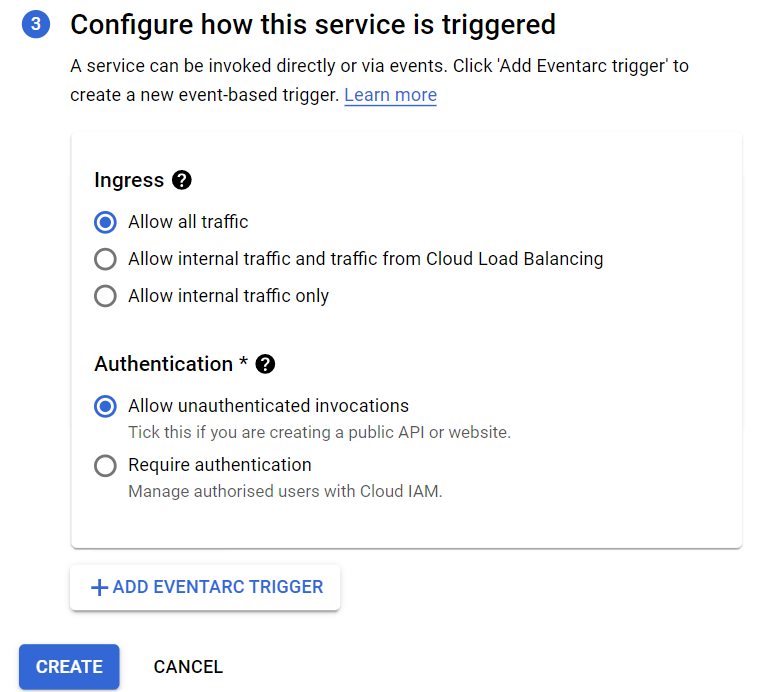
Your Cloud Run service will now be created, which can take a couple of minutes. Wait until you the loading wheel has stopped spinning and you see three green check marks indicating that everything is working correctly.
Congratulations! You have now created a GTM SS container on Cloud Run!
Mapping Custom (Sub)Domains
Although the GTM server at this stage would be functional, there are a couple of things left to do for everything to work as intended. These things are to set up a preview server (which will be used to debug GTM SS) and to map custom domains to your GTM SS and preview servers which is essential for writing and reading cookies in a first-party context.
Let's set up the preview server, which is used when previewing the GTM SS container. Go back to the start page of Cloud Run. Once again click on the 'Create Service' button.

Set the service name to something that will help you identify that this is the preview server, I'll name my preview setup 'gtm-ss-preview'. Next, set region to the same one as for your non-preview server. Click 'Next'.
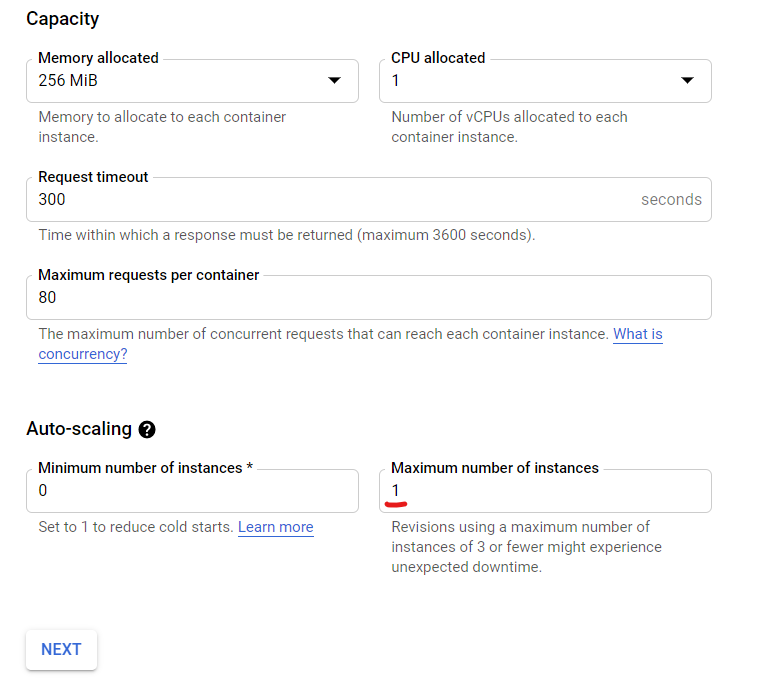
Use the same container image URL as for the production server. Open up the advanced settings, and under 'Container' go to 'Maximum number of instances' and set it to '1'. This is necessary for the preview server to function as all preview traffic must be routed through the same instance. Apart from this, use the same 'Container' settings as for your production server.
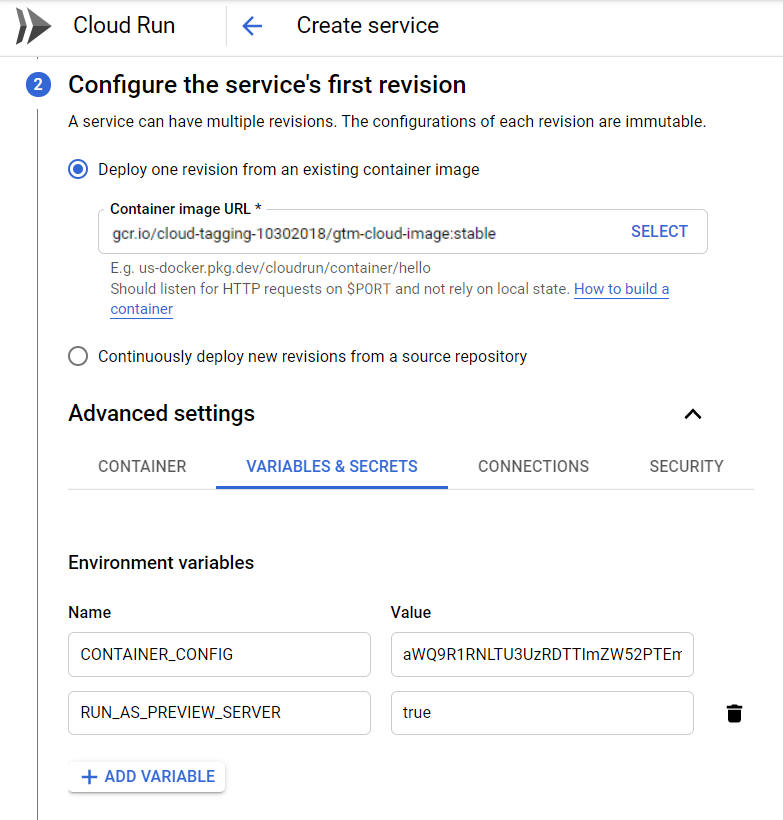
Go to 'Variables & Secrets' under advanced settings. We will have to set two variables this time around. Click twice on the 'Add variable' button to add the input fields. For the first variable, input CONTAINER_CONFIG as variable name and your container configuration ID from GTM SS as the variable value (i.e. the same as for your production server). For the second variable, input RUN_AS_PREVIEW_SERVER as name and 'true' as value.
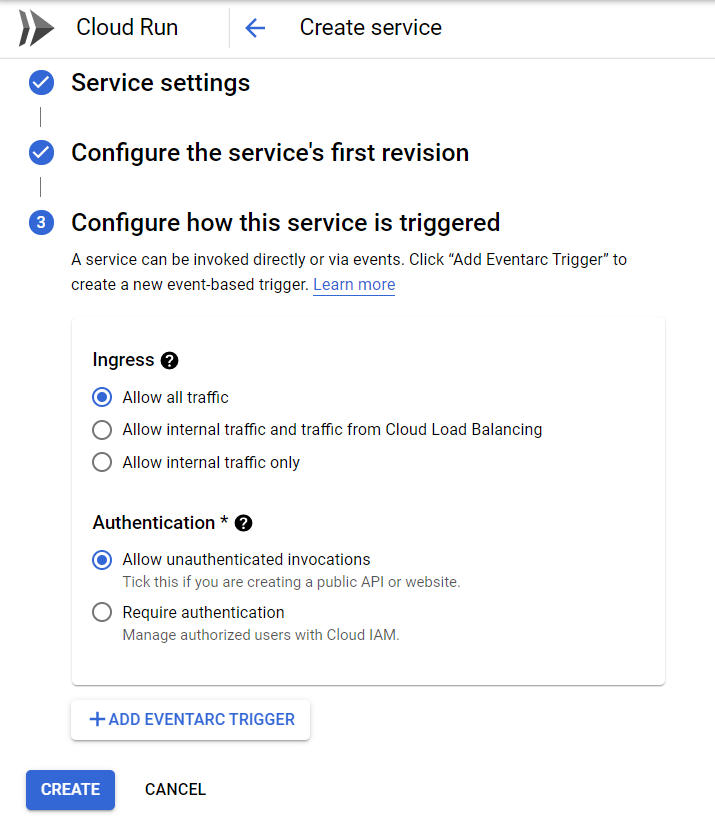
Click 'Next' and in the last settings section select 'Allow all traffic' under 'Ingress' and 'Allow unauthenticated invocations' under 'Authentication'. Now slam that 'CREATE' button.
Wait a moment for the preview server to be created. Once you see a green checkmark go back to the start page of Cloud Run to see your two Cloud Run services.

We're almost finished, there are just a few more steps. What we'll want to do next is map our Cloud Run services to a custom domain. This could be its own unique domain, but as GTM SS is (commonly) used for tracking purposes on an existing website, we want to map the GTM SS container to a subdomain of the website that is to be tracked, for example tracking.yourdomain.com.
The reason that GTM SS should be mapped to a subdomain is because it enables the service to set first-party cookies on the website that it is collecting data from. First-party cookies can be used to identify returning visitors, and as the server will set an HTTP cookie it will not be affected by Apple's Intelligent Tracking Prevention (ITP).
To start the process of mapping the Cloud Run services to a subdomain, click on the 'MANAGE CUSTOM DOMAIN' button.

As we want to map both the preview server and the production server, we will need to do the mapping process twice. Click 'ADD MAPPING', and a popup will appear.
In the first popup field, select the service you want to map (i.e. either the production or the debug service).
For the second field, you will need to verify the subdomain that the Cloud Run services will be running on. You will need to use separate verified domains for the production and debug server. For my setup, I have verified the domains gtm.oskarholm.se (production server) and debug.gtm.oskarholm.se (debug server).
If you are unfamiliar with how to verify a domain, you can read more about it here. I usually go for adding a txt record to the domain I'm verifying, but there are other options as well. As the process of adding DNS records varies depending on where you are hosting your website, I will not try to guide you through this step. In case you don't know what to do, you should be able to Google your way forward.
Please note that you do not want to use your root domain (TLD+1) as the verified domain, but the actual subdomain where you want the GTM SS container to be running on. GTM SS will still work if you use the verified root domain, but you will only be able to map CNAME record instead of A/AAAA records – a setup that might limit your tracking capabilities on Apple's ecosystem if the domain is flagged as using CNAME cloaking.
In the last field, input the subdomain that the service should be running on. If you have set the verified domain to the subdomain (as recommended) leave this field blank.
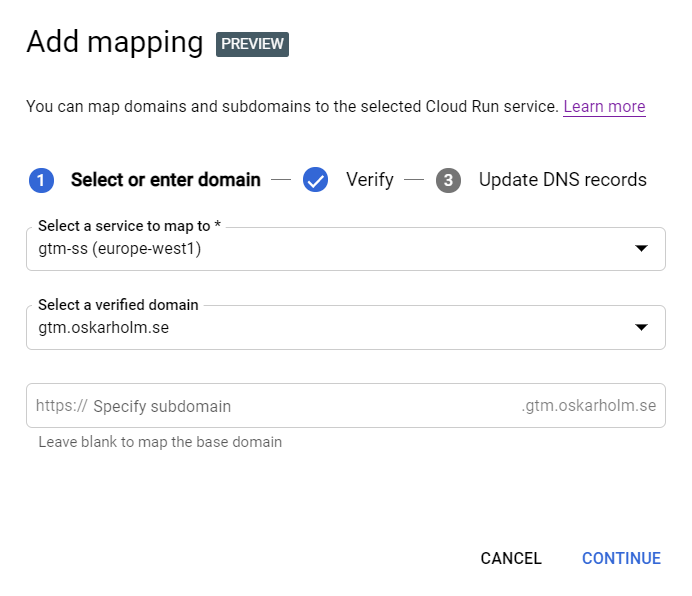
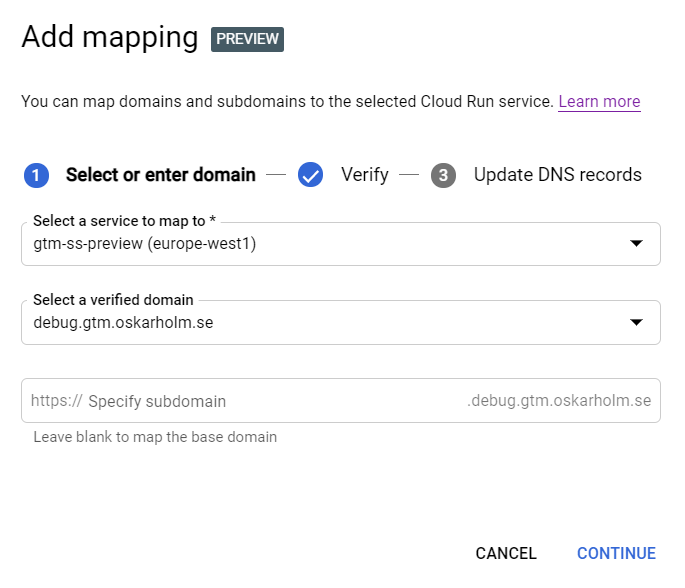
Click 'CONTINUE', and you will be given A/AAAA records.
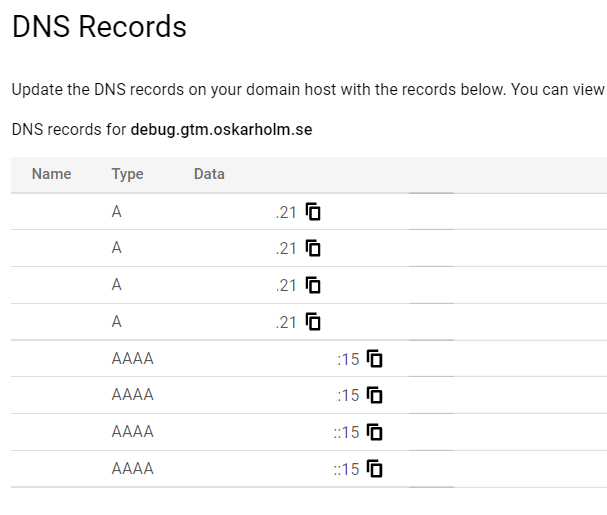
Head over to your DNS provider's website and update your DNS with these records. Once you have updated your DNS for both the production and preview server, you are ready to move on to the last step.
Now that the production and preview servers have been mapped to custom subdomains, we will need to link the preview server to the production server.
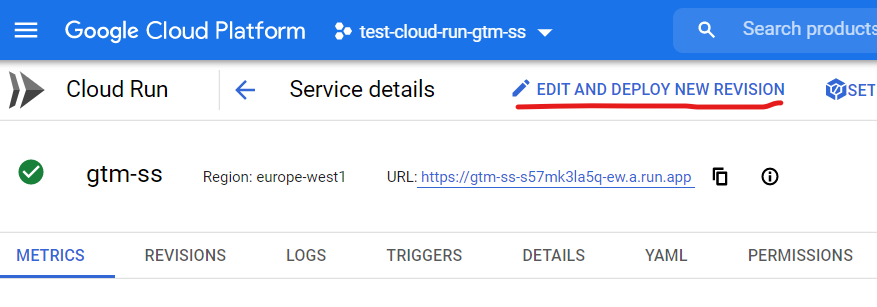
Go back to the start page of Cloud Run, and click on the name of your production service (in my case 'gtm-ss'). Click on 'EDIT AND DEPLOY NEW REVISION'.
Open up 'Variables & Secrets'. Click on the 'ADD VARIABLE' button, located beneath the CONTAINER_CONFIG variable. As variable name input PREVIEW_SERVER_URL, and enter the subdomain that you have mapped to the preview server, in my case this would be debug.gtm.oskarholm.se.
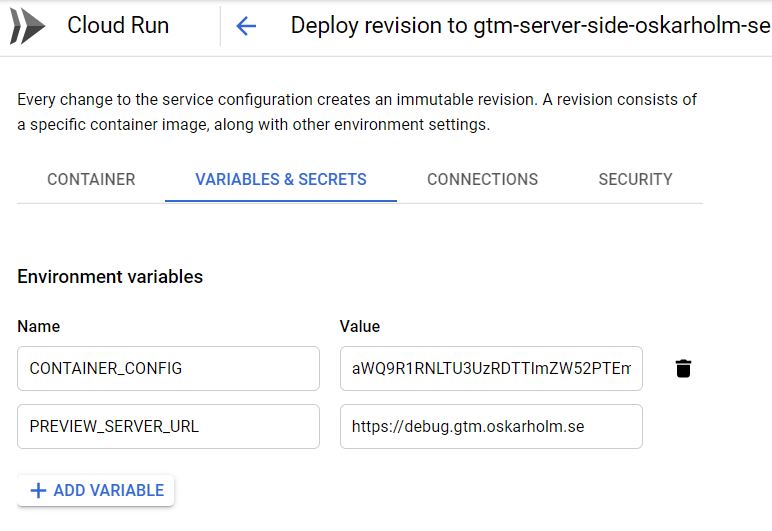
After adding the variable, hit 'DEPLOY'. Wait for the deploy to roll out, and look for the green checkmark.
BOOM! We are now done with the setting up GTM SS. Before celebrating, let's make a final check that everything seems to be in order.
Validating the GTM SS Setup
Go to tagmanager.google.com and open up your newly created GTM SS container.
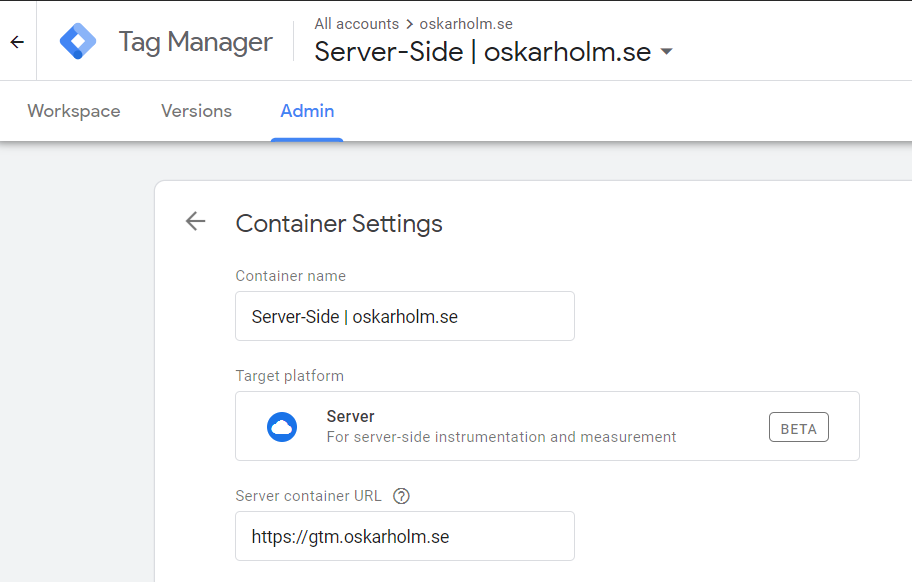
Go to 'Admin' → 'Container settings'. Enter the subdomain of your production server under 'Server container URL' and save the change. This is needed to preview your GTM server.
Go back to the workspace and click on the 'Preview' button in the top right corner. The preview window should now open up. Open up a new window in your browser and enter the URL of your production server (in my case gtm.oskarholm.se). On the left side of the preview window there should now appear a '/'. This is because it has received an incoming request with the URL path '/'. Nice!

Since you haven't created any GTM SS clients, nothing will happen with the request, but this will at least show you that the setup is working. In case you don't see the incoming request in preview mode, check that you have entered the correct preview URL in the Cloud Run production service, and that you have entered the correct production URL in GTM SS container settings.
If the setup seems correct, but you still can't see any incoming requests when previewing, it could be down to the DNS records taking up to a half a day to be updated. For me, the DNS records are usually mapped within 30 minutes, but depending on your DNS provider this time can vary.
This turned out to be quite an extensive post, but I hope you managed to make your way through it and that GTM SS is up and running on Cloud Run for you. Feel free to leave a comment if you have any questions or have any ideas of how to improve my recommended Cloud Run setup. Thanks for reading!

